Local LAN and Firewall for Virtual Machines
Posted 2025-08-10
Preface: This page runs custom JS code for the generator at the bottom, but the source is non-obfuscated.
If you’ve ever used a virtual machine, whether for testing shady applications, multi-os app development, or to have Windows locked down as it should be, you probably have connected it to the internet at some point. Unfortunately I have some bad news: this whole time you may have been exposing your virtual machine to your LAN network.
Here is an example where I spawned an Ubuntu VM with virt-manager’s default network interface. Through the VM, I am able to access my local TrueNAS server.
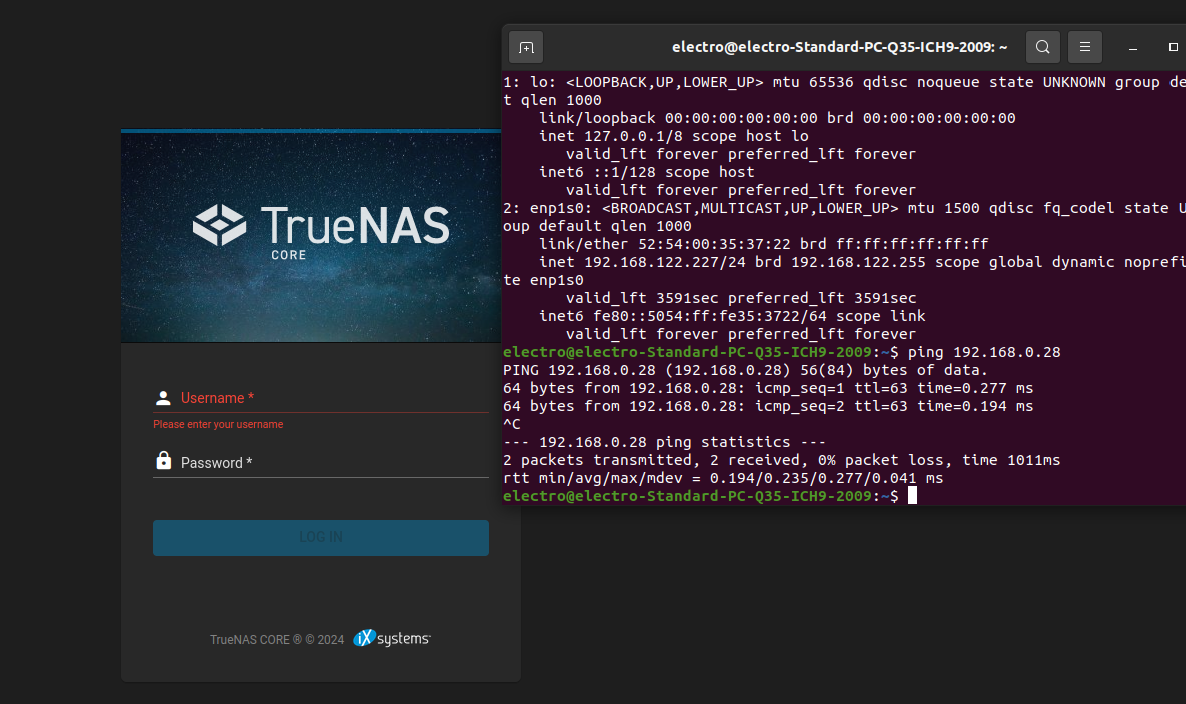
When I initially found this out, it was a bit spooky. While my personal attack vector are quite low, given I am not a target (I think!), I don’t run shady apps on my VMs, and I rarely start them in the first place, I could see this turning into a potential big problem.
This sort of makes sense looking at the network from the VM’s perspective: the “host” becomes a router, and the virtual network interface it’s connected on is it’s “LAN”, and anything outside of that, including your home network, is its “WAN”. So 192.168.0.2 becomes another “Internet” device. At least that’s how I explained it to myself.
This post is to make awareness of this issue, and how you can fix it.
Solution: Bridge with custom iptable rules
The best solution that I have come up with, thus far, is to manually create a network bridge and set rules in iptable to allow NAT and forwarding. Essentially we are using our host machine as a “router” and setting rules as to how traffic gets forwarded from a VM to the Internet, which includes blocking LAN traffic. This is similar to what virt-manager and many VM managers already does, but we will be directly controlling the firewall.
A lot of this post and my setup is based off libvirtd’s custom router network docs page1, so please check it out!
The rest of this post will describe the config that I’m using.
Step 1: Enable IP forwarding
First thing to do is to enable IP forwarding in the kernel. This is done by having the following configuration in /etc/sysctl.conf, which can be added with the following commands. This only has to be done one-time, and the file additions should stay persistent per reboot.
echo "net.ipv4.ip_forward=1" >> /etc/sysctl.conf
echo "net.ipv4.conf.all.forwarding=1" >> /etc/sysctl.conf
While ipv6 can be enabled, I did not bother.
What you need to do per host startup is to enable these changes, I am not sure if there’s a way to have them be persistent. This can be done with:
sysctl -p
Step 2: I have a bridge to sell you
Next is to create the bridge interface that the VM will bind to. This bridge will not be setup to actually bridge anything on it’s own, but purely act as a virtual interface.
The following commands I used to create a bridge and assign the host to 192.168.100.1:
brctl addbr virbr10
brctl stp virbr10 on
ip address add 192.168.100.1/24 dev virbr10 broadcast 192.168.100.255
ip link set virbr10 up
Step 3: The Great Firewall
Next up is to define the iptable rules. iptables is a tool to interface with the Linux kernel’s network rules. The network flow is quite complex, as shown in the following image from iptable’s Wikipedia page2. I hope I can do an OK job at explaining the rules to be ran for this setup, but I am by no means a network expert.
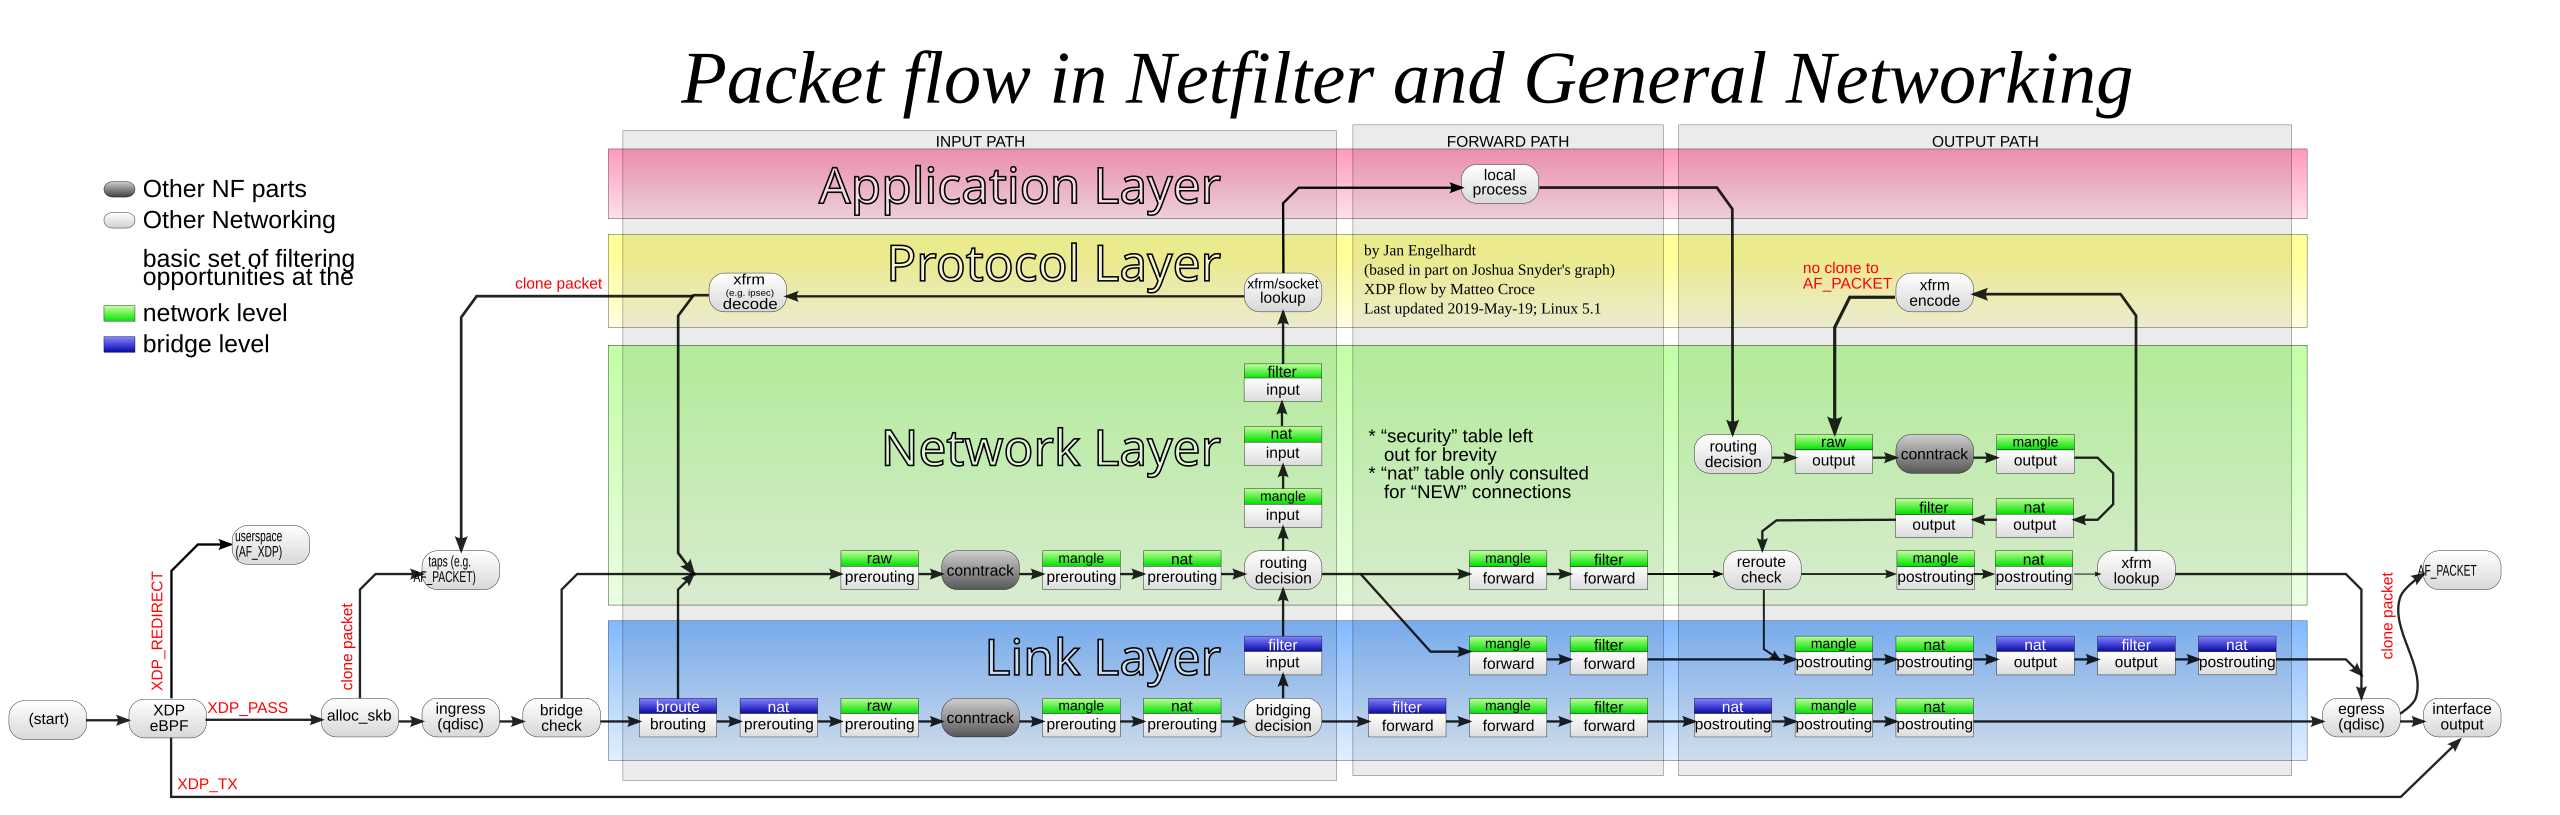
The rules we will be creating will do the following:
- Setup Network Address Translation (NAT)3. This allows the bridge network’s outgoing traffic (such as to the internet), which has a different subnet (the 192.168.100.0/24 we specified earlier), to go through the host’s single-ip given by the local router. This is something your router does as well, mapping the LAN ips (192.168.0.x devices) to the router’s WAN single ip provided by your ISP.
- Setup forwarding rules defining which traffic is forwarded to/from the bridge network to the internet, and which are blocked.
Something to keep in mind when reading the rules is, per table and chain, the filters are sequential. So if there’s a reject rule before an accept rule, anything rejected by the first rule will not move on to the second rule.
The following list of commands will create all the rules:
### NAT and postrouting

# Block any postrouting nat request going out to multicast
iptables -t nat -A POSTROUTING -s 192.168.100.0/24 -d 224.0.0.0/24 -j RETURN
# Block any postrouting nat request going to broadcast
iptables -t nat -A POSTROUTING -s 192.168.100.0/24 -d 255.255.255.255/32 -j RETURN
# Masquerade any packet from our subnet to everything but that (notice the !)
iptables -t nat -A POSTROUTING -s 192.168.100.0/24 ! -d 192.168.100.0/24 -j MASQUERADE

### Forwarding rules for NAT

# not 100% sure, I think it allows tracked connecions into the interface
# I think so that if there's any existing tracked packets they are let through with ease
iptables -t filter -A FORWARD -d 192.168.100.0/24 -o virbr10 -m conntrack --ctstate RELATED,ESTABLISHED -j ACCEPT
# reject anything going from our bridge device to our LAN (change `192.168.0.0/24 to your LAN`)
iptables -t filter -A FORWARD -d 192.168.0.0/24 -i virbr10 -j REJECT
# accept any other packets from the bridge's subnet
iptables -t filter -A FORWARD -s 192.168.100.0/24 -i virbr10 -j ACCEPT
# Allow any connections to/from the same bridge interface
iptables -t filter -A FORWARD -i virbr10 -o virbr10 -j ACCEPT
# Reject any other packets to/from the bridge interface with an icmp port unreachable error
iptables -t filter -A FORWARD -i virbr10 -j REJECT --reject-with icmp-port-unreachable
iptables -t filter -A FORWARD -o virbr10 -j REJECT --reject-with icmp-port-unreachable

### input rules for dhcp/dns

# Allow tcp input from the bridge into the host's local process
iptables -t filter -A INPUT -i virbr10 -p udp -m udp -m multiport --dports 53,67 -j ACCEPT
# Allow tcp input from the bridge into the host's local process
iptables -t filter -A INPUT -i virbr10 -p tcp -m tcp -m multiport --dports 53,67 -j ACCEPT

# something to fix some bug with dns and checksum, not 100% sure?
iptables -t mangle -A POSTROUTING -o virbr10 -p udp -m udp --dport 68 -j CHECKSUM --checksum-fill
To remove the rules, run the same commands but replace -A with -D.
Step 4: Local DHCP server
The last part is to setup a local dhcp server. This isn’t required per say, but is nice to allow dynamic IPs for VMs (especially when multiple are involved).
We will be using dnsmasq for the local server.
First is to write a config file for dnsmasq. The following file can be saved to /var/lib/dnsmasq/virbr10/dnsmasq.conf. It could be saved anywhere, I think that directory is somewhat standard though.
# Only bind to the virtual bridge. This avoids conflicts with other running
# dnsmasq instances.
except-interface=lo
interface=virbr10
bind-dynamic

# If using dnsmasq 2.62 or older, remove "bind-dynamic" and "interface" lines
# and uncomment these lines instead:
#bind-interfaces
#listen-address=192.168.100.1

# IPv4 addresses to offer to VMs. This should match the chosen subnet.
dhcp-range=192.168.100.2,192.168.100.254,255.255.255.0

# Set this to at least the total number of addresses in DHCP-enabled subnets.
dhcp-lease-max=253

# File to write DHCP lease information to.
dhcp-leasefile=/var/lib/dnsmasq/virbr10/leases
# File to read DHCP host information from.
dhcp-hostsfile=/var/lib/dnsmasq/virbr10/hostsfile
# Avoid problems with old or broken clients.
dhcp-no-override
# https://www.redhat.com/archives/libvir-list/2010-March/msg00038.html
strict-order

dhcp-authoritative
To start the server, simply run the following command, referencing the config file we just made. This will run it not a daemon (in foreground), so it can be exited with CTRL+C. The PID file argument is optional, only if you run it in daemon mode (removing -d) and want to know the process ID to kill it.
dnsmasq --conf-file=/var/lib/dnsmasq/virbr10/dnsmasq.conf --pid-file=/var/run/dnsmasq/virbr10.pid -d
virt-manager changes
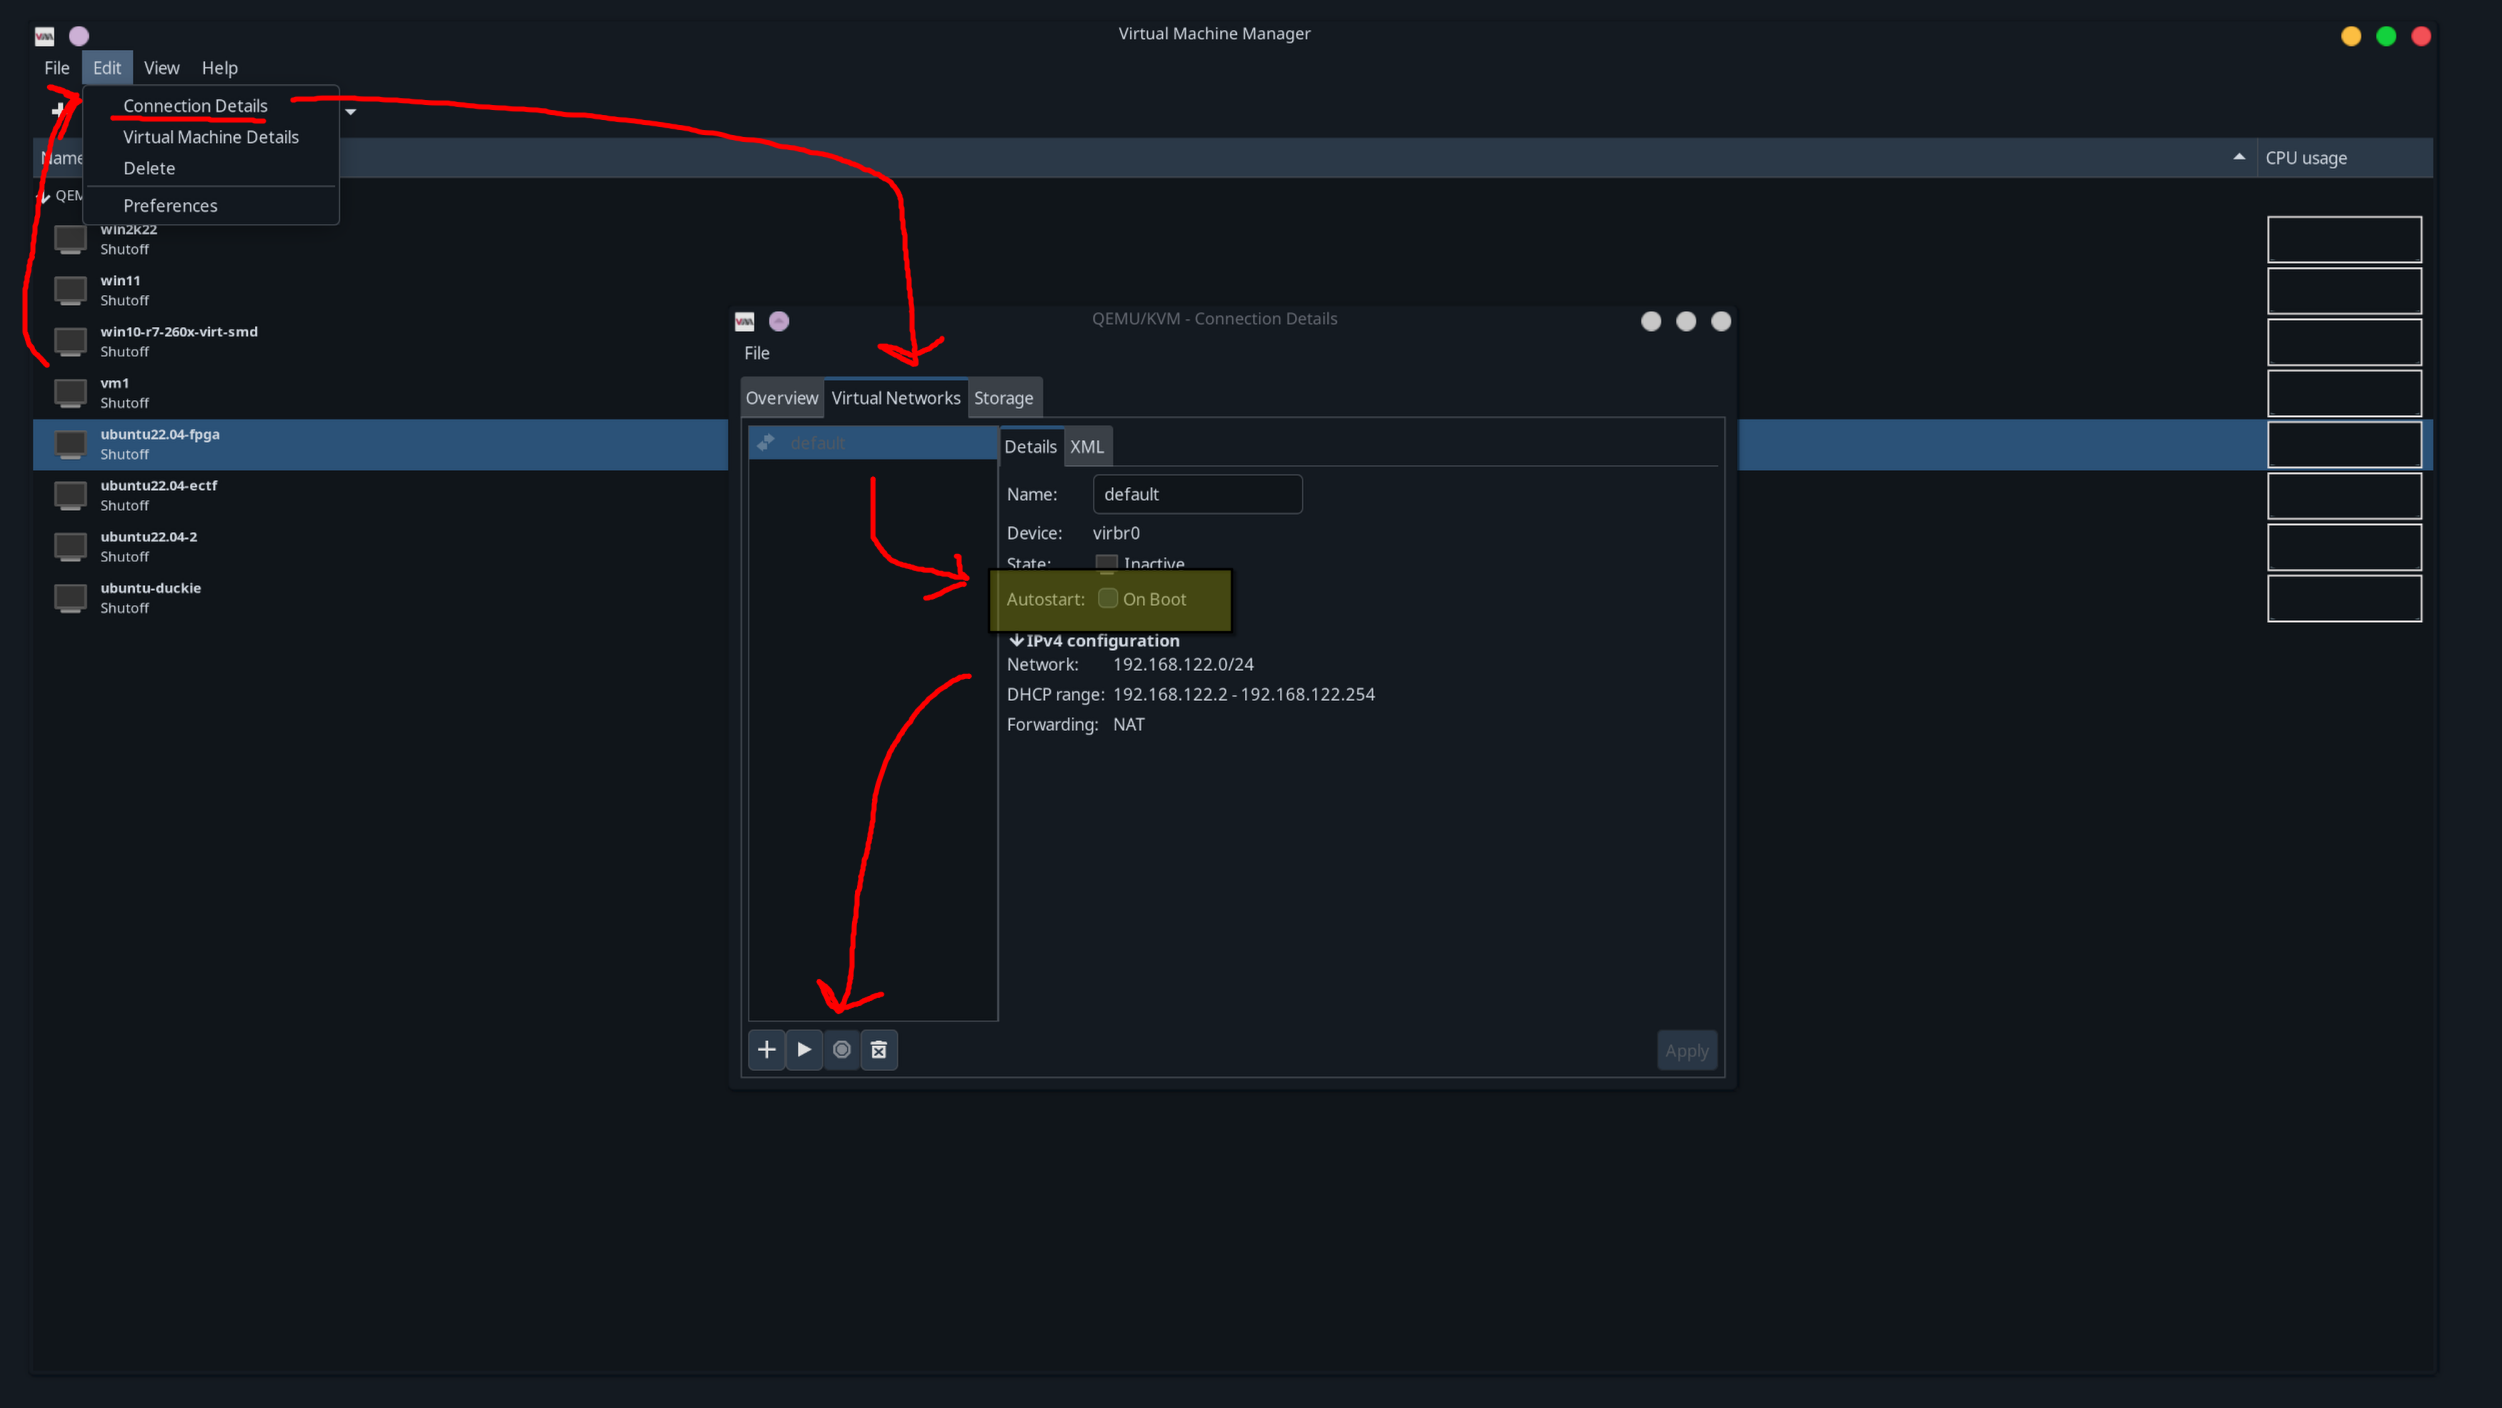
If you are using virt-manager, I would disable the default network from automatically starting up. This can be done by going to “Edit->Connection Details” from the main virt-manager window, then going to “Virtual Networks” and unchecking “autostart” for the default network. Optionally turn off the network if it’s already running through the stop button at the bottom.
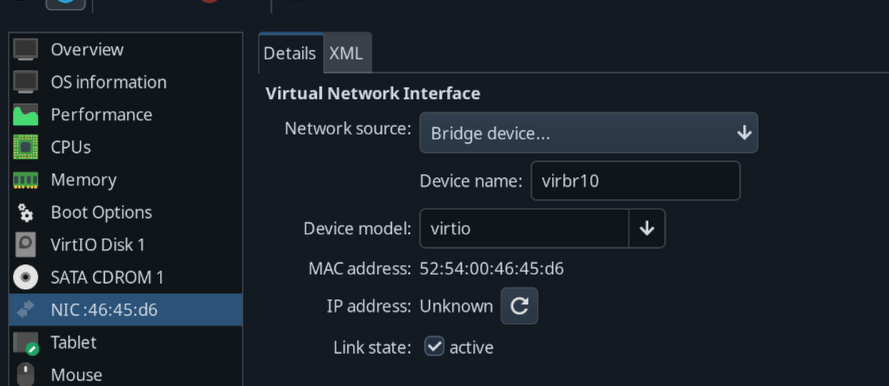
To use the bridge for a VM, in a VM’s network option, change the network source to “Bridge device”, and type in the name of the bridge we made (in this post virbr10)
Other uses, local secure network for embedded
Another handy use-case I use the iptable and dhcp setup above for is a local network between my PC and an embedded system like a raspberry pi, my test equipment, or other things. I run the same commands mentioned in this post, but I skip the bridge setup, and replace virbr10 in iptable and dnsmasq commands/config with the desired interface, in my case enp6s0.
I do this primarily to connect said system(s) from my LAN network while giving them Internet access, which reduces any potential attack vectors that may arise, and there is no need for my PI to speak to LAN. Another advantage is full network monitoring, which can be handy for debugging and reverse engineering. It’s also handy if you have a single device you want to give internet access to, but you only have a USB-Ethernet or secondary Ethernet adapter on your machine and no switch nearby.
Commands Generator
Below is a quick generator I made that outputs the bridge creation, iptable commands, and dnsmasq config, as well as their teardown. The IP Mask entry should be the IP of the host with the mask, such as the default 192.168.100.1/24.
If you want to use it for a local net like I mentioned above, change the bridge name to the interface name and don’t run the bridge creation/teardown commands.
Bridge and iptable rules command generator:
dnsmasq config, to be stored in ``