Globe.GL and Three.js: Weather Balloon and PCB Assembly
Posted 2025-05-11
In this post, I will be describing my adventures into creating 3d environments in the web with globe.gl and three.js, as basic as my examples are.
Two examples that I made are a weather balloon flight path visualizer, and a 3d viewer of a board and enclosure
The source code for both can be found just be loading the webpage, I don’t do none of that JS obfuscation rubbish.
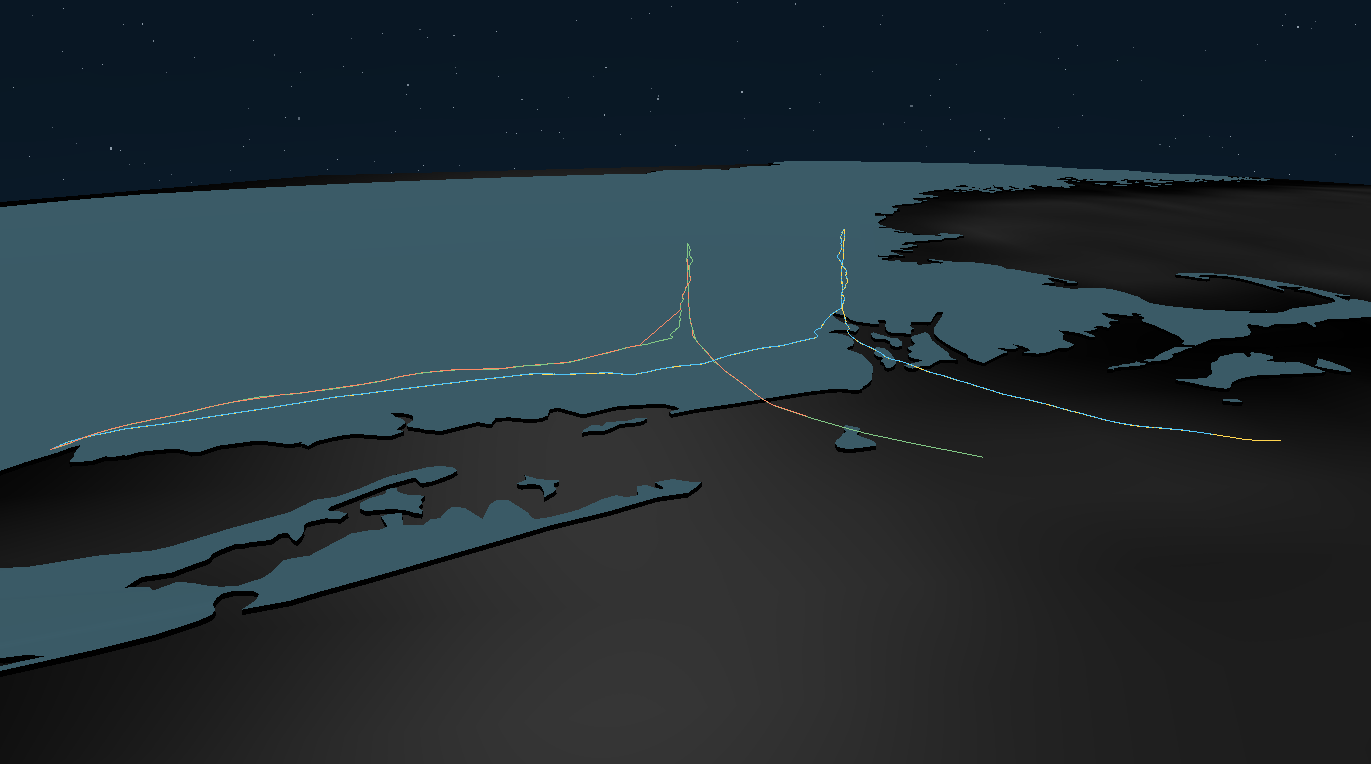
Weather Balloon Visualization
This entire adventure started because of a weather balloon. At my university (UNewHaven), two weather balloon were launched with two transmitters each. Flight data was aggregated with SondeHub, and I plotted some basic visualization with matplotlib, like altitude vs time, temperature vs time, etc.
Then I though “what if it would be cool to have a 3d movable visualization of the trajectory?”
Upon some initial investigation, I knew I wanted to preview it in the web so it’s accessible to everybody. I also knew I wanted it to be intractable so one can move around the flight path. I came across a javascript plugin called globe.gl, which looked like everything I needed. It’s a plugin that visualizes the globe. I started with one of their example which just loaded a globe and went from there.
Adding Trajectory
After loading a globe, I needed to trace the flight path. The best way I found was to use the library’s customThreeObject function to manually add geometry. globe.js uses three.js under the hood (a 3d engine of sorts), so I can add a THREE Line with the flight coordinates.
The data downloaded from SondeHub was a JSON list of dictionaries with keys like lat, lon, etc. First I loaded all json files I defined in a constant. I used the Promise object to wait for all the data to be loaded by calling .all() into a function, in this case a map of the file list loading them. After all loading is done, the addDataToMap function is called with the imported data. I also added a catch in case the JSON files cannot be loaded or any other errors occurred.
const ballonFiles = ['8A847DF0.json', '22059875.json', '24071886.json', 'A8D116F0.json'];

Promise.all(ballonFiles.map( file =>
    fetch('data/'+file).then(res => res.json())
))
.then( data => {
        addDataToMap(data);
})
.catch( err => {
    console.error("Error when loading json", err);
});
Inside of the addDataToMap function, for each item in the list, I created another list t of THREE vectors with the latitude, longitude, and altitude already converted to coordinates in globe.js land with the getCoords function. I divide the altitude by 6371000 as that is the average radius of the earth in meters, while getCoords wants it as a 0 to 1 value. This new list of THREE vectors and the element index is pushed unto another list keyValues that will be iterated later.
let keyValues = [];

dat.forEach((element, elementIdx) => {
    const t = element.map(dict => {
        const {x, y, z} = gl.getCoords(dict.lat, dict.lon, dict.alt/6371000);
        return new THREE.Vector3(x, y, z);
    });
    keyValues.push([t, elementIdx]);
});
I then set the globe.gl custom layer data to this mega-list. From there we can pass a callback to the customThreeObject function determining what to do with this data, in this case create a THREE geometry from the array of Vector3 vectors, create a material with a color defined from the element index and a manually created color list (chatgpt generated, the colors look good), then return a THREE line from the geometry and material created. I also pass an empty callback into customThreeObjectUpdate, which I think is needed even if it does nothing in my case.
const colorMap = ['#4FC3F7', '#81C784', '#FFD54F', '#FF8A65'];

gl.customLayerData(keyValues);

gl.customThreeObject(dat => {
    const geometry = new THREE.BufferGeometry().setFromPoints(dat[0]);
    const material = new THREE.LineBasicMaterial({ linewidth: 3, color: colorMap[dat[1]] });
    return new THREE.Line(geometry, material);
});

gl.customThreeObjectUpdate((obj, d) => {});
I also set the point of view to around the University as the center. The values were manually tweaked for best starting point.
gl.pointOfView({lat: 41.29118964554642, lng: -72.96053588264805, altitude: 0.6}, 0); // Focus center
Detailed US Map
The map image that is part of globe.gl’s examples, while sufficient for an all-globe view, was not detailed enough for when zoomed into two state.
A simple solution would be to find or generate a high resolution image. I initially tried exporting a map from QGIS, but there were two problems. The main issue was the image needed to be an extremely high resolution (on the order of 47025 × 23500), where I only cared about a small portion of it. This caused the globe to not even load even after 5 min of waiting.
The second minor issue is I had alignment issues (tested with a lower res images), which I probably could have fixed, but figured worth a mention.
After the two issues above, I shifted into drawing polygons of countries instead of loading a globe image. I still loaded the “low-res” globe image so it isn’t just a black sphere after drawing the country’s polygons.
I fetched the world-atlas jsons which provides topological data from Natural Earth already converted to a TopoJSON format. The topojson library was used to process this data, loading the countries as polygon features.
I used the countries-100m.json data for iterative testing, then switched to countries-10m.json for the final result.
Before I could draw the polygon, I wanted to filter by only the US, otherwise the rest of the world would also be rendered, wasting unnecessary compute and slowing things down. Thankfully the features object has a filter function, which I used to only return the US’s data. The key properties.name was found by browsing through the topological json data.
The following code is what I came up with, first loading the json file, importing it as a topojson feature, filtering by property name (for the country), then adding it as a polygon for the globe object. The altitude of 0.0001 was the lowest I could go before the globe sphere intersected with the country’s polygons, resulting in intersection artifacts.
fetch('//unpkg.com/world-atlas@2.0.2/countries-10m.json').then(res => res.json())
.then(landTopo => {
    const features = topojson.feature(landTopo, landTopo.objects.countries).features;
    const usOnly = features.filter(f => {
        return f.properties.name === "United States of America";
    });

    gl
    .polygonsData(usOnly)
    .polygonCapMaterial(new THREE.MeshLambertMaterial({ color: '#3a5a66', side: THREE.DoubleSide }))
    .polygonSideColor(() => '#000000')
    .polygonCapCurvatureResolution(1)
    .polygonAltitude(0.0001);
})
Awkward moving
By default, globe.gl’s movement is one centered around the earth. This is fine for some cases, but in my case I wanted to move around like a video game. Looking into globe.gl’s source code, they use THREE.js’s OrbitControls. Looking at other available controls, I figured FlyControls is what I wanted.
Looking around forms and asking ChatGPT, I initially tried to dispose of the controls from globe.gl, create my own orbit controls, then set the controls to that:
gl.controls().dispose();

mapControls = new FlyControls(gl.camera(), gl.renderer().domElement);
mapControls.domElement = gl.renderer().domElement;
gl.controls(mapControls);
// gl.controls = mapControls;
mapControls.update();
I don’t think this worked. As I’ve started to look into replacing the controls, I came across the parent library for globe.gl, three-globe. It seems like globe.gl is a nice wrapper around three-globe that sets up the environments (camera, light, etc), and looking around the source code confirms it.
So I migrated my code to use three-globe directly. I looked at their day/night cycle example for reference, and I got to work.
It wasn’t difficult really, I just created a THREE scene, created a camera and controls, and created a looping animation function.
Even at this stage, if I set the controls to an OrbitControls, everything works as expected, but with FlyControls it doesn’t.
After hours of troubleshooting and pain, I figured it out. All of this non-functioning controls…because of a SINGLE ARGUMENT. In the animation function, the controls update function took no arguments. Well with a FlyControls, it is required to give it some delta. I figured this out partially by staring at THREE’s FlyControls example and noticing they were passing something into the update function.
(function animate() {
    // Frame cycle
    // tbControls.update();      // doesn't work :(
    tbControls.update(0.015);    // works
    renderer.render(scene, camera);
    requestAnimationFrame(animate);
  })();
While I was frustrated and salty, I was happy I at least found a solution.
I updated the camera and controls so they were in positions I liked in the addDataToMap function. I needed to position the camera, call the setPointOfView function (not sure if 100% needed), then have the camera look at a target.
Finding the values was done iteratively.
let coords = gl.getCoords(39, -72, 0.025);
console.log(coords);
camera.position.x = coords.x;
camera.position.y = coords.y;
camera.position.z = coords.z;
gl.setPointOfView(camera);

coords = gl.getCoords(41.2911896455464, -72.96053588264805, 0);
console.log(coords);
const lookAtVect = new THREE.Vector3(coords.x, coords.y, coords.z);
camera.lookAt(lookAtVect);
tbControls.target = lookAtVect;
Stars
At this point I was mostly happy with the result, but wanted to add some extra flare. What better way than some stars!
I essentially copied part of THREE’s FlyControls example where they also add stars. They do this by creating two random list of vectors, then randomly select one of the two vector list and a material, rotate the whole vector list randomly and giving it a random scale, then adding those set of points to the scene, repeated 290 times. I had to tweak the iteration amount and the variable r until I got an alright looking set of stars from the starting position.
const r = 10, starsGeometry = [ new THREE.BufferGeometry(), new THREE.BufferGeometry() ];

const vertices1 = [];
const vertices2 = [];

const vertex = new THREE.Vector3();

for ( let i = 0; i < 250; i ++ ) {
    vertex.x = Math.random() * 2 - 1;
    vertex.y = Math.random() * 2 - 1;
    vertex.z = Math.random() * 2 - 1;
    vertex.multiplyScalar( r );

    vertices1.push( vertex.x, vertex.y, vertex.z );
}

for ( let i = 0; i < 1500; i ++ ) {
    vertex.x = Math.random() * 2 - 1;
    vertex.y = Math.random() * 2 - 1;
    vertex.z = Math.random() * 2 - 1;
    vertex.multiplyScalar( r );

    vertices2.push( vertex.x, vertex.y, vertex.z );
}

starsGeometry[ 0 ].setAttribute( 'position', new THREE.Float32BufferAttribute( vertices1, 3 ) );
starsGeometry[ 1 ].setAttribute( 'position', new THREE.Float32BufferAttribute( vertices2, 3 ) );

const starsMaterials = [
    new THREE.PointsMaterial( { color: 0x9c9c9c } ),
    new THREE.PointsMaterial( { color: 0x838383 } ),
    new THREE.PointsMaterial( { color: 0x5a5a5a } )
];

for ( let i = 10; i < 300; i ++ ) {
    const stars = new THREE.Points( starsGeometry[ i % 2 ], starsMaterials[ i % 3 ] );

    stars.rotation.x = Math.random() * 6;
    stars.rotation.y = Math.random() * 6;
    stars.rotation.z = Math.random() * 6;
    stars.scale.setScalar( i * 5 );

    stars.matrixAutoUpdate = false;
    stars.updateMatrix();

    scene.add( stars );
}
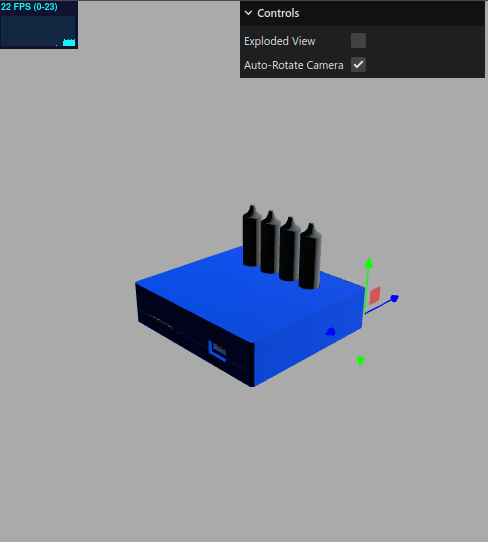
PCB 3D Exploded View
A couple of days or so after I worked on the balloon path visualizer above, I wanted to try something new: visualizing a board I designed with its enclosure. With me diving a bit into THREE.js before, a bit more than expected, I had enough knowledge to get started on this.
As I was looking through THREE.js’s examples, I came across this hand movement one. While I didn’t plan on doing any IK, I used the code example to load a 3d model and to add a TransformControls (the selection thing allowing to move an object in 3d).
I setup my THREE scene by creating the Scene, giving it a grey-ish background, adding a perspective camera, adding an ambient light, adding an orbit control, adding a Stat thing to display FPS, and creating a WebGLRenderer object to render to. The renderer had an animation loop which just updates the orbit controls, renders, and updates the stats.
function animate( ) {
    orbitControls.update(0.05);
    renderer.render( scene, camera );
    stats.update(); // fps stats
}
Importing, Controls, and Transform
To import a model, THREE.js recommends the gltf file format. I have never heard of this format, but so be it. Thankfully FreeCAD (where I had the PCB and enclosure assembly) supports exporting into a gltf format, so I did so for my assembly.
To import, I used this code partially derived from the THREE.js example:
const dracoLoader = new DRACOLoader();
dracoLoader.setDecoderPath( 'jsm/libs/draco/' );
const gltfLoader = new GLTFLoader();
gltfLoader.setDRACOLoader( dracoLoader );

const gltf = await gltfLoader.loadAsync( 'Assembly.gltf' );

gltf.scene.scale.set(100, 100, 100);
gltf.scene.traverse( n => {
    if(n.name === 'Body001') OOI.topCover = n;
    if(n.name === 'SingleDigitVFDDriver_002') OOI.pcb = n;
} );
scene.add( gltf.scene );
You might notice I scale the imported model. Later on when I was trying to position things, I noticed things were off from what I expected. Adding a GridHelper helped me (no pun intended) determine that the assembly from FreeCAD was getting imported in meter scales. I suppose that makes sense
I wanted everything to be in reasonable scale, so I decided to scale my imported object by 100 so everything is in centimeter scale, a bit more manageable.
You might also notice I am storing the reference of Body001 and SingleDigitVFDDriver_002 into a dictionary, as I use them later on. The former is the top cover, the latter is the PCB. Those were the names given in the FreeCAD assembly, with a space replaced with _.
I created a TransformControls to be able to move the top cover. I attached the controls to the top cover, and that automatically moves it when the controls is moved. Neat stuff. I also copied the two even listeners from the example, which otherwise the camera would move while moving the top cover, a bit undesired.
const t = new TransformControls( camera, renderer.domElement );
t.size = 0.75;
t.showX = false;
t.space = 'world';
t.attach( OOI.topCover );
scene.add( t.getHelper() );
t.addEventListener( 'mouseDown', () => orbitControls.enabled = false );
t.addEventListener( 'mouseUp', () => orbitControls.enabled = true );
transformControls['topCov'] = t;
At this point I also set the OrbitControls to auto-rotate around the assembly. The target was set to halfway into the enclosure, with a guessed Y axis (vertical).
orbitControls.autoRotate = true;
orbitControls.target.set(8.9/2, 2, -8.2/2);
Ambient Light Issues
I had only initially added an AmbientLight to the scene, and my imported enclosure and PCB was all black. After some digging around, turns out I had to add a directional light. For some reason the material that gets imported from the gltf file doesn’t work well with ambient light.
ChatGPT did generated the following code (in the n.isMesh if statement) to replace the material with something THREE.js renders with ambient light, but for some reason this slowed down my render even more.
gltf.scene.traverse( n => {

    if(n.name === 'Body001') OOI.topCover = n;
    if(n.name === 'SingleDigitVFDDriver_002') OOI.pcb = n;

    // chargpt generated, with tree.js mentor model
    if (n.isMesh) {
        const oldMat = n.material;
        n.material = new THREE.MeshStandardMaterial({
            map: oldMat.map,
            color: oldMat.color,
            metalness: 0.4,
            roughness: 1.0
        });
    }

} );
So for the time being I just kept the directional light and added another one.
GUI Controls
After some troubleshooting, I got it to the point where I had a functioning 3d render. I wanted to add an exploded view option, and to be able to turn on/off the auto-rotate. Looking through the THREE.js example, they had some UI controls. This comes from their GUI add-on, handy.
I added two boolean actions; one to enable/disable the exploded view, and the other to enable/disable the camera auto-rotation.
const actions = {
    explodedView: false,
    autoRotate: true
};

const gui = new GUI();

const explodedViewAct = gui.add(actions, 'explodedView').name("Exploded View");
explodedViewAct.onChange(() => updateExplodedView());
const autoRotAct = gui.add(actions, 'autoRotate').name("Auto-Rotate Camera");
autoRotAct.onChange(() => updateAutoRotate());
gui.open();
Both controls calls a callback each when changed. The auto-rotate callback just sets the boolean for the OrbitControls auto-rotate setting:
function updateAutoRotate(){
    orbitControls.autoRotate = actions.autoRotate;
}
The other, for exploded view, sets the position of the PCB and top cover to the position on import, then if the exploded view is set moves the PCB and top cover by a set position. I also had to copy the position while importing the assembly to be used by this function.
OOI.topCover.importPos = OOI.topCover.position.clone();
OOI.pcb.importPos = OOI.pcb.position.clone();
// ^^^^^ done inside the init function

function updateExplodedView(){
    if(actions.explodedView){
        OOI.topCover.position.copy(OOI.topCover.importPos);
        OOI.pcb.position.copy(OOI.pcb.importPos);

        OOI.topCover.position.y += 0.1;
        OOI.pcb.position.y += 0.025;
    } else {
        OOI.topCover.position.copy(OOI.topCover.importPos);
        OOI.pcb.position.copy(OOI.pcb.importPos);
    }
}
End Note: ChatGPT
While I am not in favor of using “AI” for creative works, I find it handy for programming and searching for pointers of things. This was especially the case of three.js, which they trained a GPT just for their library, and gave me good pointer as to what I should add and look for.
It is important through that you at least partially understand what the code does, otherwise good luck when troubleshooting or when you need to make modifications. Learning from the generated code also expands your own knowledge.